In this article, we will explain how to use the Remofirst time-off tracking tool to handle all time off requests made by your employees, and how to make time off requests on your employees' behalf.
Approving or Rejecting Time Off Requests
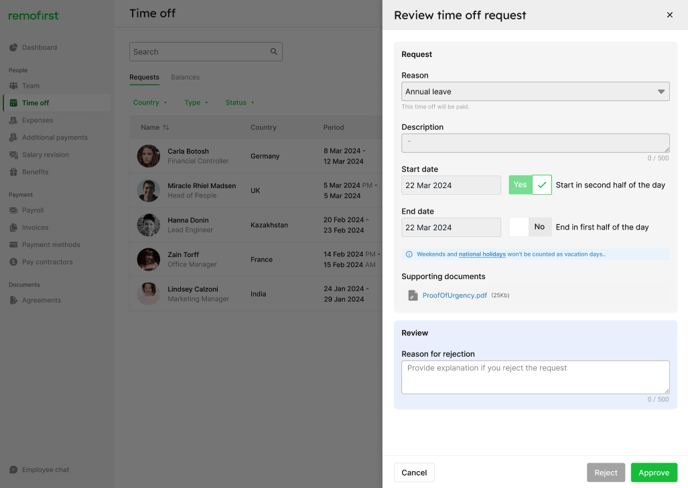
Step 1. Log in to your account and select Time off from the left-side menu. If no requests have been made, this page will be empty.
- Here in the "requests" tab you will see all time off requests made by your employees.

Step 2. To approve or reject a new time off request, select a pending time off request, review the reason and any supporting documents. You can then:
- Click "Approve" which will change the status of the request to "approved".
- Click "Reject" which will change the status of the request to "rejected". In order to reject a request, you must provide a reason for your employee in the blue "Review" box.

Viewing your Employees' Time-Off Balance Breakdowns
To get an overview of your whole team's time-off balances, navigate to the "Balances" tab in the Time off page.
Here you will see a list of all of your employees alongside their time-off balances:

If you click on an individual employee, you will see a more in-depth breakdown of that employee's time off balances. You will also be able to access supporting documents in this balance breakdown window.

Here, you can also add an "ad-hoc adjustment" if you wish to grant your employee more vacation days for any reason. These days will be added to their "available days" balance, and will not have any accrual requirement.

Adding a Time Off request on behalf of your Employee
Click on the green "Add time-off" button in the top right corner of the "Requests" tab in the Time off section.

Step 1. Choose the relevant employee and specify the dates.
- Please specify Start and End date
- If the employee will take time off starting from the second half of the day, please select Start from second half of the day. That means that only 0.5 days will be added instead of 1 day.
- If the employee needs to take only half a day on the last day of their time off, please select End in first half of the day. That means that only 0.5 days will be added instead of 1 day.
Total time off is calculated without including weekends or national holidays in the employee's country of residence.
Step 2. Choose a Reason for the time off request
There are multiple Reasons:
- Vacation, Sick leave, Parental leave, Caregiver leave, Educational leave, Marriage leave, Military training assembly, Military medical examination, Military leave, Sabbatical, Civic Duties, Religious observance, Bereavement.
Step 3. Provide a description and supporting documents (if required).
- You can leave a description for the time off request that you are creating (this step is optional). You can also attach a proof document for time offs, such as a doctor's note. This step is also optional.
Step 4. Click Add to formally request time off via the Remofirst Platform. The employee in question will receive a notification asking them to approve the time off request from their Remofirst account. Until it is approved or rejected by the employee, it will have the status "pending'. You can also cancel time off requests up until the start date of the leave period.

You are also able to edit a pending time-off request that you have made on behalf of your employee. Once a request is made, navigate to the "requests" tab in the Time off section, click on the relevant request and make any updates you need to. Once this is done, click "Update". You are not able to make changes once the request has been approved.

Handling Unpaid Time Off Requests
Please note: all time off requests made by your or your employees will be Paid by default. This is because only our local teams have the required regulatory knowledge to ascertain and flag a request that should be Unpaid in the employee's country of residence.

- If a time off request made by you or your employee is flagged by our local team as needing to be Unpaid, you will receive an email notification from us asking you to review this.
- When you receive this email, please navigate to the Time Off section in the platform and click on the relevant request. Here you will see a yellow box in the "Review" section, containing the reason why the request has been flagged and changed to "unpaid".
- The request will still have an "approved" or "pending" status depending on its status at the time of flagging, but you will now have the option to cancel the updated unpaid time off by changing its status in the "Status" drop down menu and filling in the "reason for change".
- Once this is done, click "Update" to finalise things.

